
Introduction
I’ve been reading good things about Open Media Vault (OMV) for a while now, and have decided it’s time to give it a try for myself. I have a new Proxmox host that isn’t currently doing a great deal so I’ve decided to spin up a new VM and install OVM there.
Until this point in time, I’ve been in the habit of directly attaching new hard disk drives directly to my Proxmox hosts (usually using SATA) and then passing them through to a Linux VM. The Linux VM then shares out the volumes over SMB, FTP, etc. This is all configured at the command line and although I have the process nailed down, I thought it might be interesting to see if using OMV could make things less arduous.
What is Open Media Vault?
Open Media Vault (OMV) is a Debian-based Linux operating system. Out of the box, it aims to implement a NAS (Network Attached Storage) system with minimal configuration. It allows you to easily share your data over the likes of SMB, CIFS, NFS, FTP, etc.
It’s well regarded for its ease of configuration and use. Even if I decide to continue with my current setup, I thought it might be useful to write this post in case it helps newbie data hoarders who are perhaps not very technically minded.
Installation
Downloading the Open Media Vault installation media
For this test, I’m going to be performing a fresh installation of OMV, from its ISO file. The ISO files for all versions of OMV can be found here. At the time of writing, the latest stable release is 5.6.13, so that’s the one we’ll use today.
We could download the OMV ISO file using our Web browser and then upload it to Proxmox over its Web interface (you would select the local storage belonging to your node, navigate to “ISO Images” and click “Upload”). I find this to be quite slow, however, so I’m going to download the OMV ISO file directly to the Proxmox host.
Firstly, we need to SSH into our Proxmox host/node. I’m using PuTTY for this. Once connected, we need to issue a “cd” command to change to the directory that holds our ISO files (/var/lib/vz/template/iso):

Then, we need to use “wget” to pull the ISO file down from the OMV Sourceforge repository. We type “wget” followed by a space and then the URL to the ISO file that we found on the Sourceforge webpage. The command in my case is “wget https://netcologne.dl.sourceforge.net/project/openmediavault/5.6.13/openmediavault_5.6.13-amd64.iso”
As you can see, the download is around 620MB in size and took a little over a minute to complete. This will of course vary based on your connection speed:

Creating the OMV Virtual Machine in Proxmox
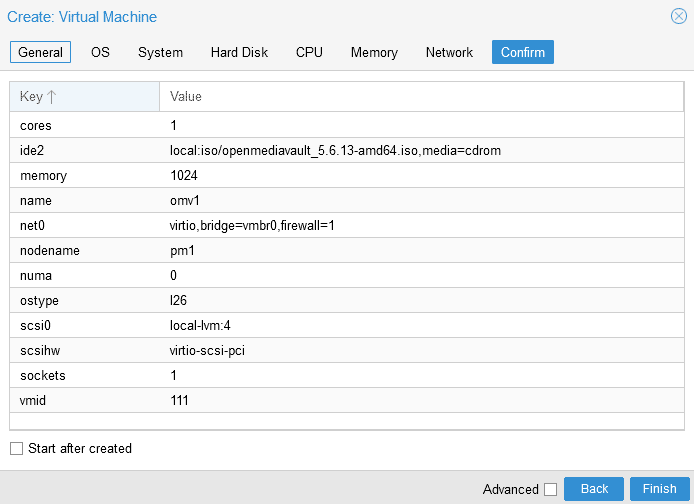
According to this document, the minimum amount of RAM needed for OMV is just 1GB, and the minimum disk size is 4GB. As this is just a limited test, I’ll create a new VM with these values.
I won’t provide step-by-step instructions for creating the VM as I’ve covered that in other posts. Here is the final step, however, showing the values used:
Performing the OMV installation
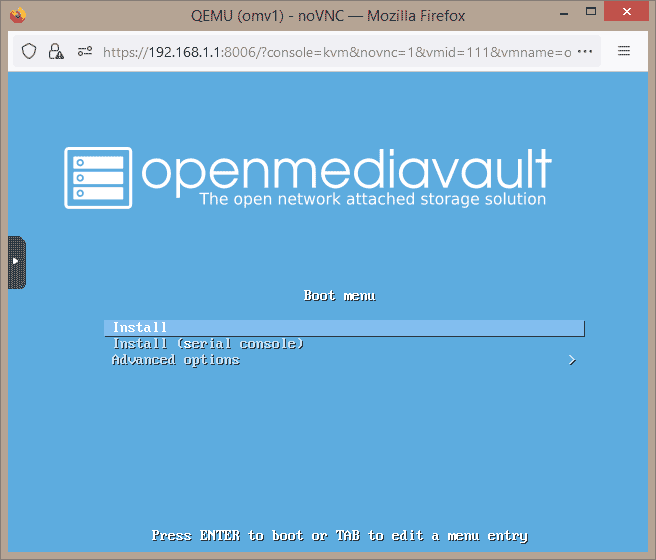
Once the VM has started, you can launch the console and should find you’re presented with the initial installation screen shown below. We’ll select “Install”:
There will then be a number of other screens asking us to choose “Language”, “Region”, “Keyboard Layout”, and so on. I won’t bother providing images as they’re all rather mundane.
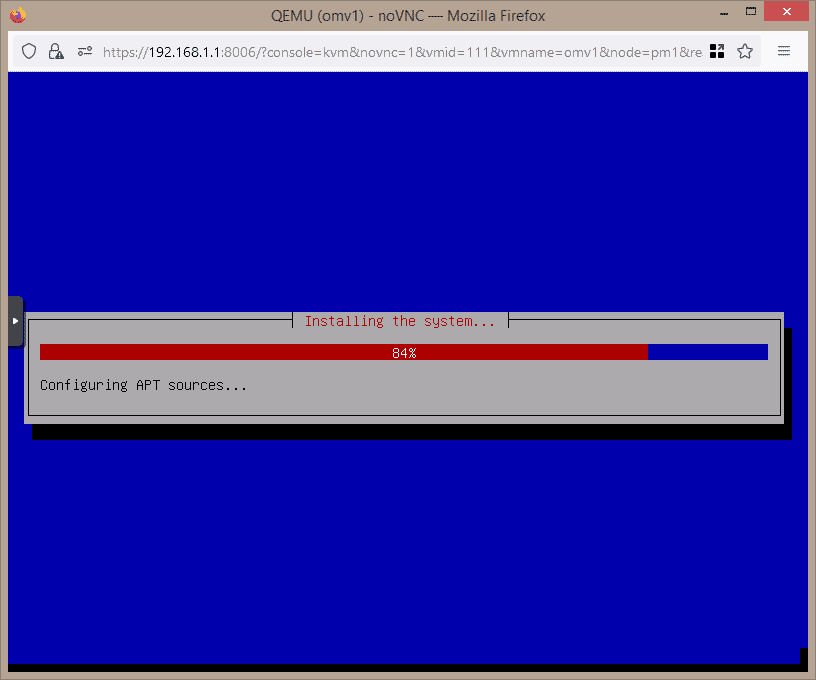
After a few minutes, you’ll be asked to choose a hostname (I left it as the default “openmediavault”), and a password for the “root” account. From here on, the installation took around 5 minutes. You should find you’re presented with a progress screen like the one below while the installation is taking place:
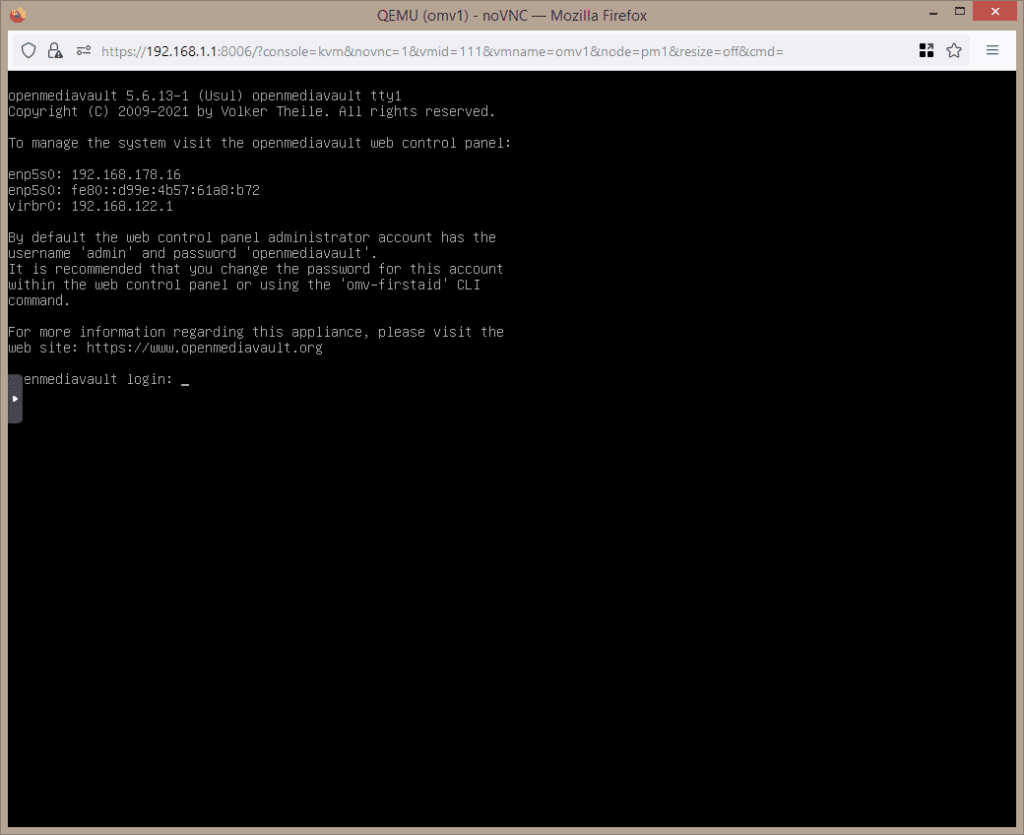
The installer will eventually advise that the installation is complete and prompt you to allow a reboot of the VM. Once the VM has rebooted you should be able to visit “http://<hostname_that_you_chose/”, in my case that’s http://openmediavault/.
This is assuming you have DHCP and DNS running in your environment. If you don’t, you can browse to the IP address listed on the console:
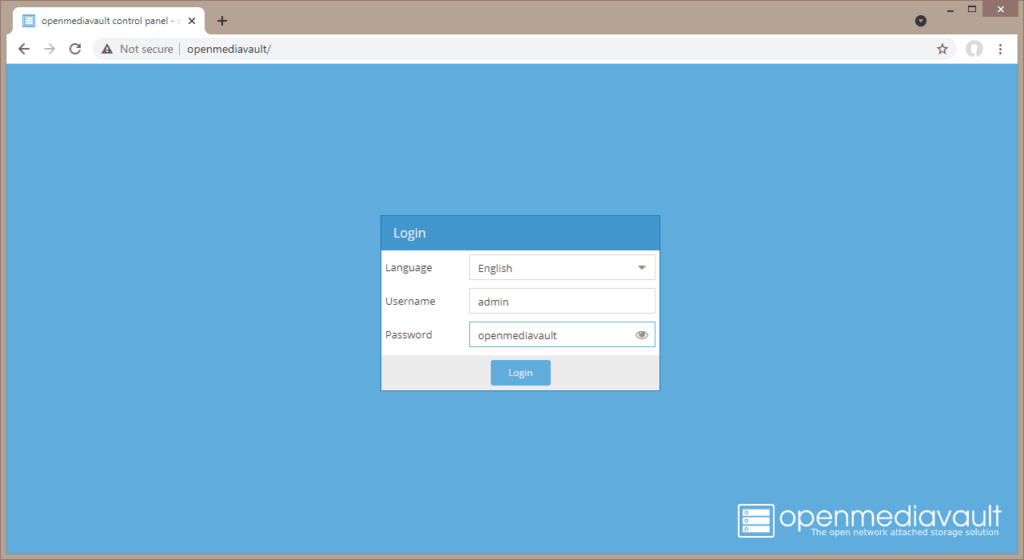
Logging into OMV for the first time
Upon visiting the URL mentioned above, you should be presented with a logon screen like this:
Enter the default username (“admin”) and password (“openmediavault”), then click “Login”.
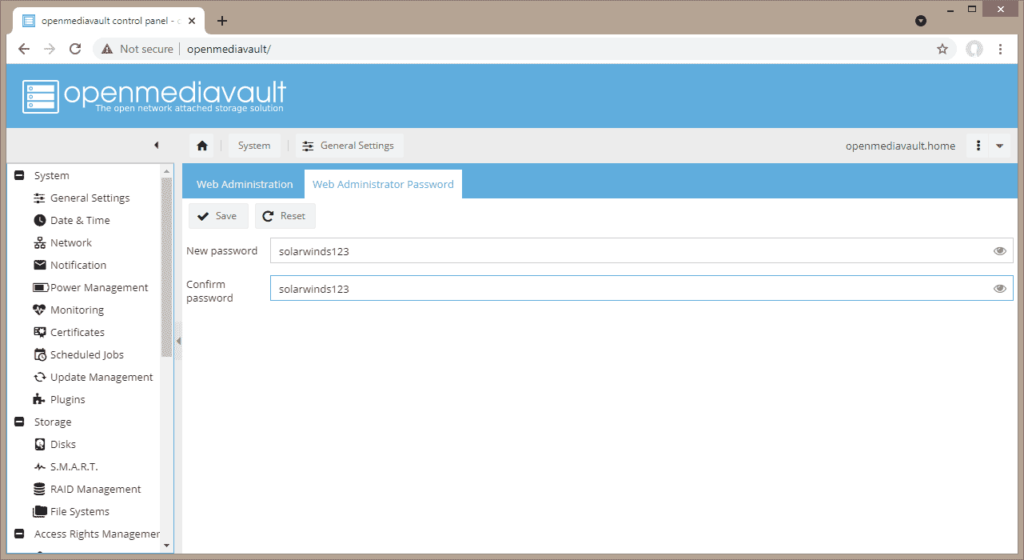
Changing the OMV admin password
Before we set anything else up, we should change the admin password. To do this, we need to browse to “System”, “General Settings”, “Web Administrator Password”. Enter a new password twice and then click “Save”. Make sure you choose something secure:
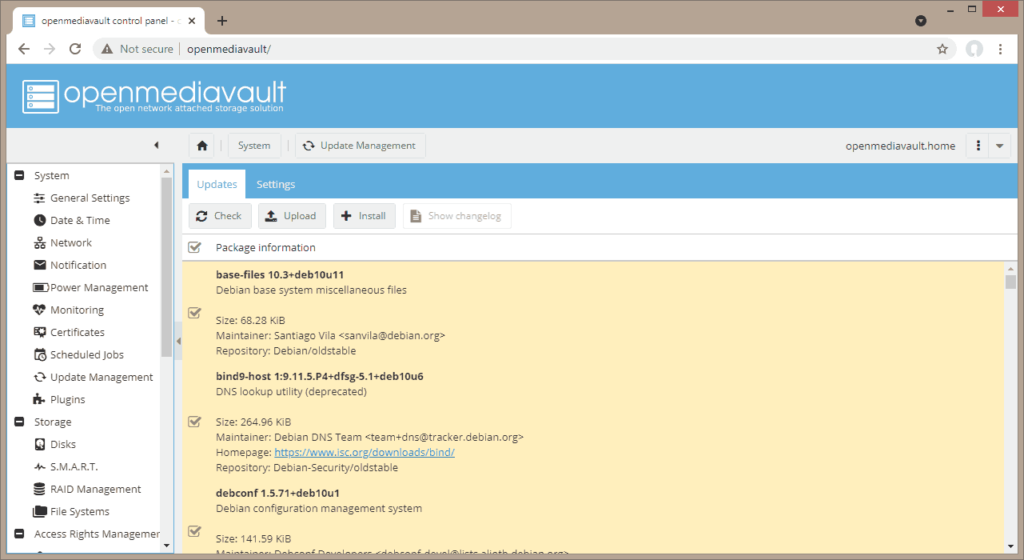
Installing updates to OMV
The next thing we should really do is check if the system has any updates available. To do this we go to “System”, “Update Management”, “Updates”, and then click “Check”.
If any are found, we can install them by clicking the “Package Information” checkbox and then clicking “Install”:
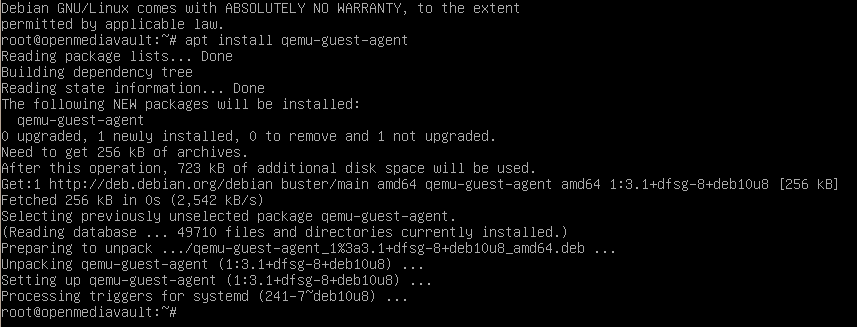
Installing Proxmox guest agent (Qemu-guest-agent)
It’s good practice to install the guest agent onto newly built VMs. It allows Proxmox to better control the power functions of the VM and makes backups/restores more reliable. As OMV is based on Debian Linux, this is a straightforward task. You can either launch the console for your new VM or SSH into it (OMV runs SSH by default on port 22, permitting root-access). Then simply issue the command “apt install qemu-guest-agent”. You should see a similar output to the image below, indicating that the guest agent has been successfully installed onto OMV:
Next, we need to shutdown the OMV VM whilst we enable the guest agent within the Proxmox Web interface. This is done by issuing a “shutdown -P now” command:

Once the VM has shutdown, go back into your Proxmox Web interface, select the OMV VM in the left-hand pane, go to “Options” and set “QEMU Guest Agent” to “Enabled”:
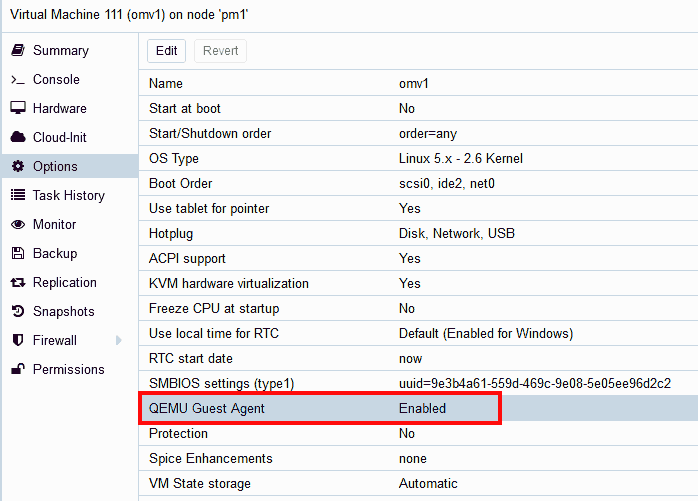
Now simply start the VM again and the guest agent will be active.
Passing a physical disk from the Proxmox host to the OMV VM
For the purposes of this test, I’m going to take a physical hard disk drive that I currently have passed through to a different VM and pass it through to the new OMV VM. This will become our OMV “data” disk, used to hold data that we want to make available to NAS clients.
I won’t write about removing the existing passthrough as it won’t apply to most readers. In any event, if you’ve managed to pass through a disk in the past, you’ll likely already know how to revert that.
I will mention that the disk is already formatted and contains data, so I will later remove the partition table so that OMV sees it as a new disk. This will let me try out the formatting options within OMV.
Step 1 – Identify the ID of your OMV Proxmox Virtual Machine
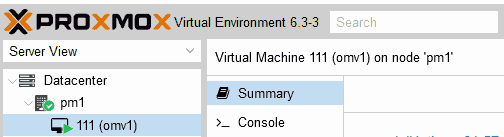
We need to know the ID of our new VM so that we can tell Proxmox which VM to pass the hard disk drive through to. This is easy enough to determine, simply open the Proxmox Web interface and find the VM in the left-hand pane. As you can see in the image below, we imaginatively called our VM “omv1”, so can see that Proxmox has assigned it an ID of “111”:
Step 2 – Identify the disk you’d like to use
There are a few ways to do this. In my case, I happen to know the serial number of the disk I’m planning to use so that makes things easy. If you take a look at your Proxmox Web interface under “Disks”, it’ll show you all disks connected to your Proxmox host, including their serial number.
From your Proxmox terminal (SSH or physical console), issue this command: “ls -l /dev/disk/by-id/ | grep -i <Serial_number_of_disk>”
My disk has a serial number of Z1GTDS54 so my command and result look like this:

Using this information, we know that the full path to the disk, in this case, is “/dev/disk/by-id/ata-ST1000DM003-1SB102_Z1GTDS54”
Step 3 – Tell Proxmox to pass the disk to the VM
Now that we’re confident we have the OMV VM ID (111) and the full path to the disk we’d like to pass to it (“/dev/disk/by-id/ata-ST1000DM003-1SB102_Z1GTDS54”) we simply issue this command:
“qm set 111 -scsi2 /dev/disk/by-id/ata-ST1000DM003-1SB102_Z1GTDS54”
This tells Proxmox to pass the disk to the VM over interface “scsi2”. This is the command and response from the OS:

Step 4 – Optional (not recommended), wiping the disk
As I mentioned earlier, the hard disk I’m using currently already has a BTRFS filesystem and some data on it. For this test, I want OMV to see this as a brand new disk so that I can see how OMV handles this.
For this reason, I’m going to overwrite the first 100 Megabytes of the disk with zeros. This should remove any partition tables and the magic BTRFS string (at offset 0x10040). I don’t recommend you do this unless you understand my reasoning and are happy to lose your existing data. The command I used, for reference, is:

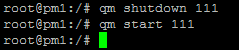
Step 5 – Stop and start the OMV VM
In order for OMV to see the newly allocated disk, we need to stop and start the VM. As we already have the guest agent installed, this is easy enough, with these two commands:
Configuring Open Media Vault
Formatting the disk / creating a new filesystem
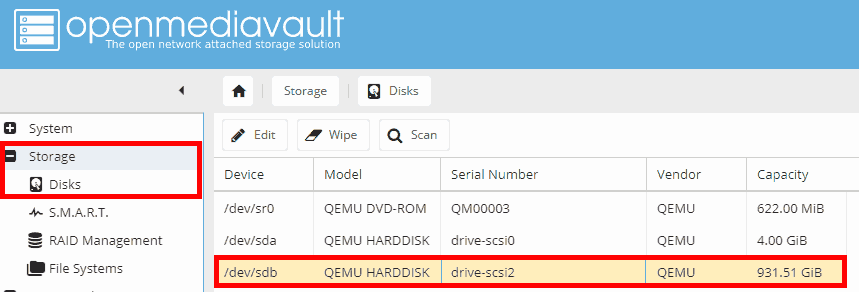
Back in the OMV Web interface, we can see under “Storage”, “Disks” that the new disk is showing, with the correct capacity:
Now let’s try creating a new filesystem on the disk by going to “Storage”, “Filesystems” and then clicking “Create”. I’m going to choose “/dev/sdb” as the device, “Datahoards” as the label, and “BTRFS” as the filesystem type.
As you can see from the image below, this has created a new BTRFS filesystem consuming the whole disk. If we wanted to create separate partitions, we’d need to do this at the command line using something like “Parted”. It seems OMV doesn’t support the creation of partitions from the Web interface.
Creating OMV users, groups, and shares
For this test, I’m going to keep things simple. I’m going to pretend my NAS only holds TV shows and Movies. It’s going to have two groups of users, “TV Addicts” and “Movie Addicts”. Users must be in one or both of these two groups to access their preferred entertainment.
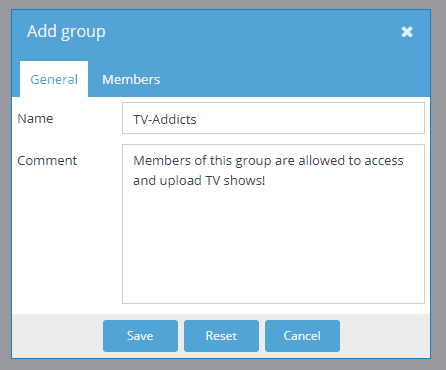
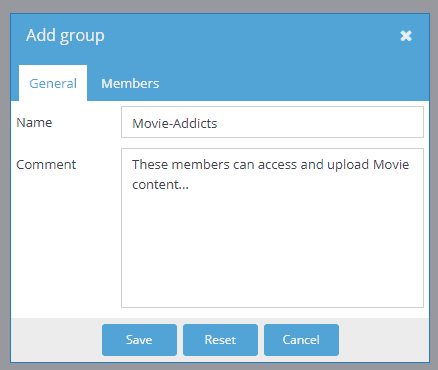
Creating the groups/users
To create our two test groups, we need to navigate to “Access Rights Management”, “Group”. Then we need to click “Add” and provide a group name and (optional) description. Please see below.
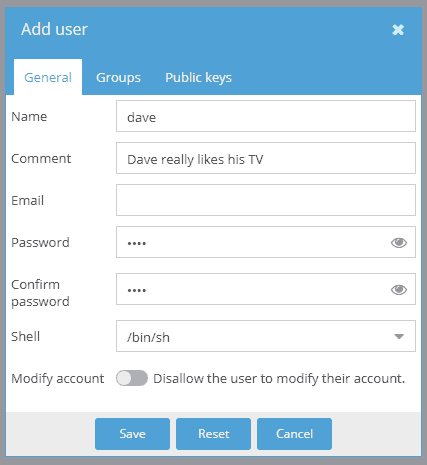
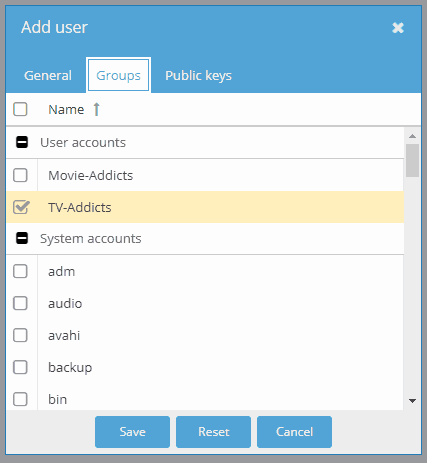
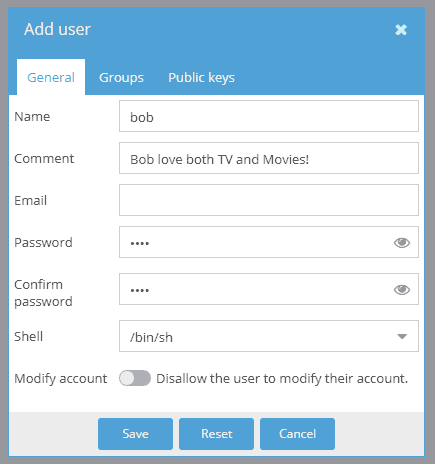
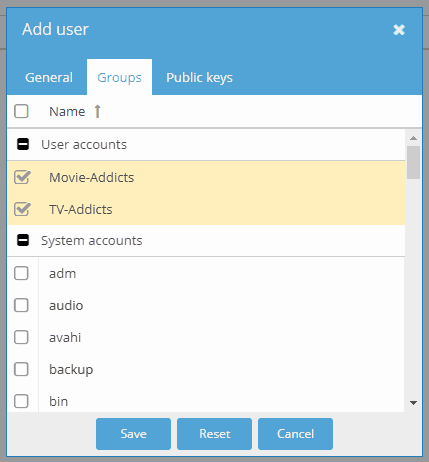
Now that the two groups exist, we can create a couple of users to add to these groups. This is done by going to “Access Rights Management”, “User” and again clicking “Add”. This time we need to provide a username, password, and optionally a comment and email address. Then we’ll click on the “Groups” tab and select the appropriate group(s):
Creating the Shared Folders
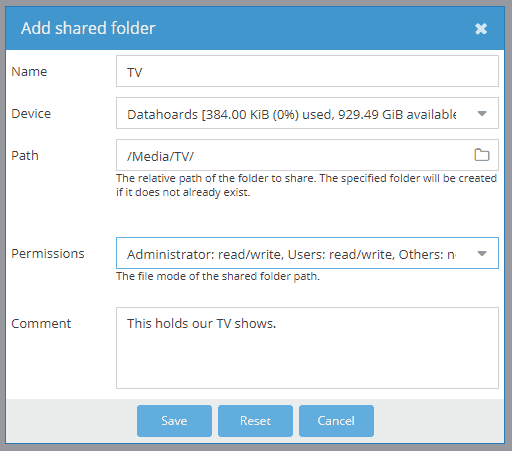
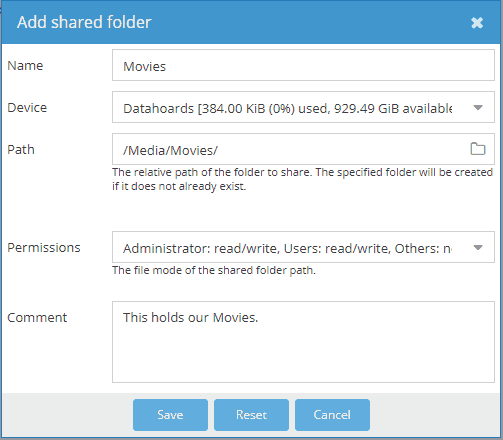
Now that we have users and groups created, we need to create the shared folders that will hold our data. We go to “Access Rights Management”, “Shared Folders” and click “Add”. We need to provide a Name, Device, Path, and optional Comment. For permissions, I chose “Administrator: read/write, Users: read/write, Others: no access” which should be self-explanatory:
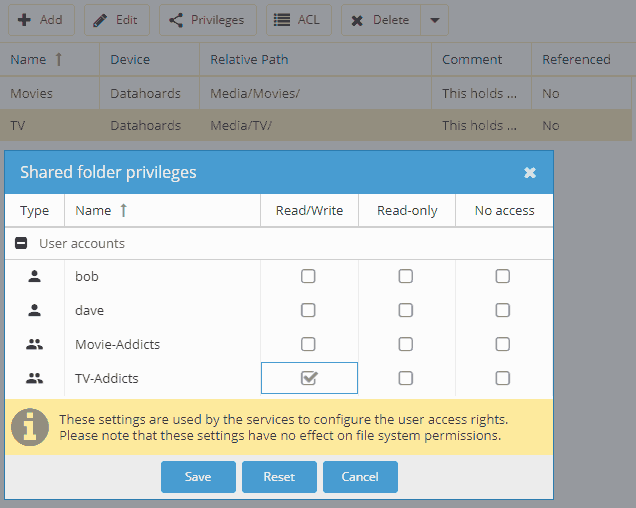
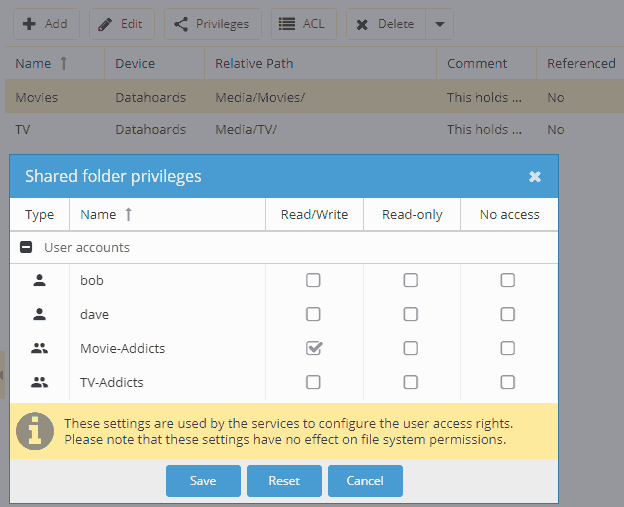
The next step is to assign the necessary permissions to the newly created folders. We’ll click on each shared folder, in turn, then click “Privileges” and allow TV-Addicts read/write access to the TV folder and Movie-Addicts read/write access to the Movies folder:
Sharing the Shared Folders
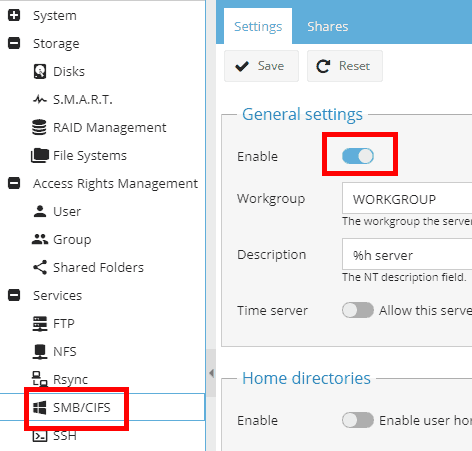
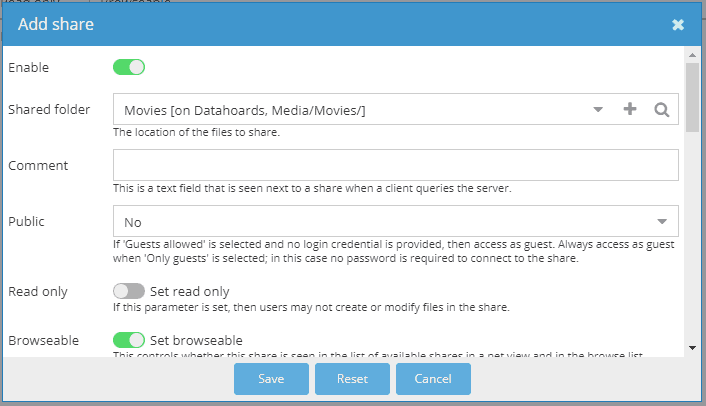
There’s just one final step to complete this setup. We need to create a share at the protocol level. For this test, I’m going to create an SMB/CIFS share so that our TV Shows and Movies can be shared out to Windows clients.
Navigate to “Services”, “SMB/CIFS” then toggle “Enable” and “Save”.
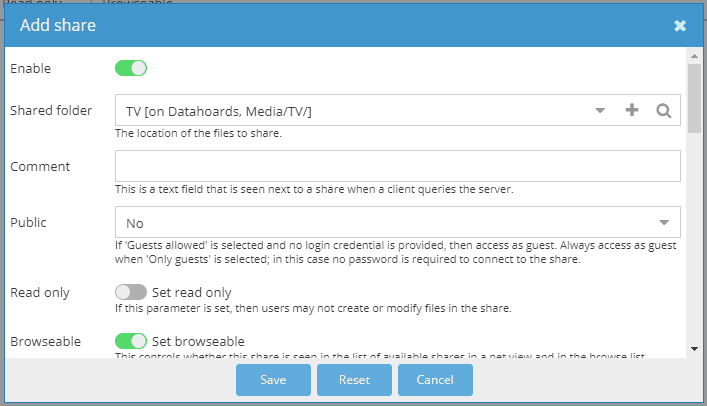
Click “Shares” and “Add”. Select one shared folder and click “Save”. Repeat for the other shared folder:
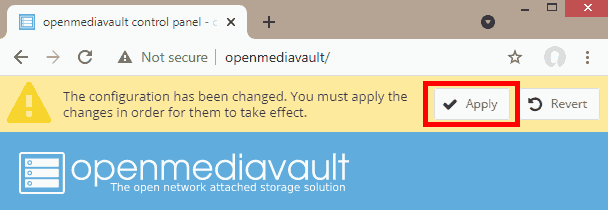
Applying Changes
Now that all the configuration is in place, we can click “Save” in the yellow bar at the top to apply our changes:
Testing our SMB/CIFS shared folders
It’s the moment of truth, time to find out if OMV is sharing our folders out over SMB/CIFS, with the correct permissions.
You should recall that “dave” is a member of the “TV-Addicts” groups, whereas “bob” is a member of both “TV-Addicts” and “Movie-Addicts”.
To test this, from a Windows box, I’m going to map a connection to the OMV server using dave’s credentials and then attempt to access both the TV and Movies SMB/CIFS shares:
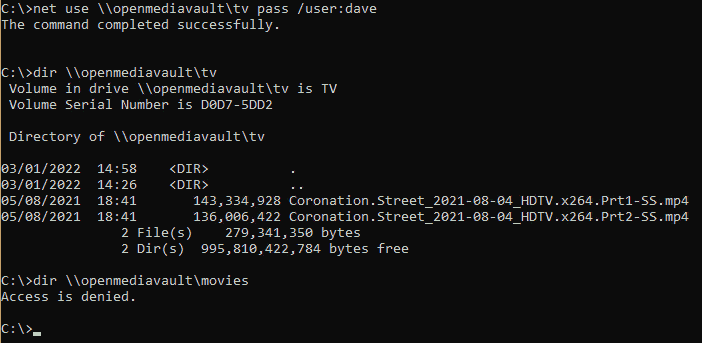
As you can see, the TV share is accessible with no issues, but the Movies share is inaccessible with the message “access denied”. So far, so good. Now I’ll delete the connection and re-establish it using bob’s credentials:
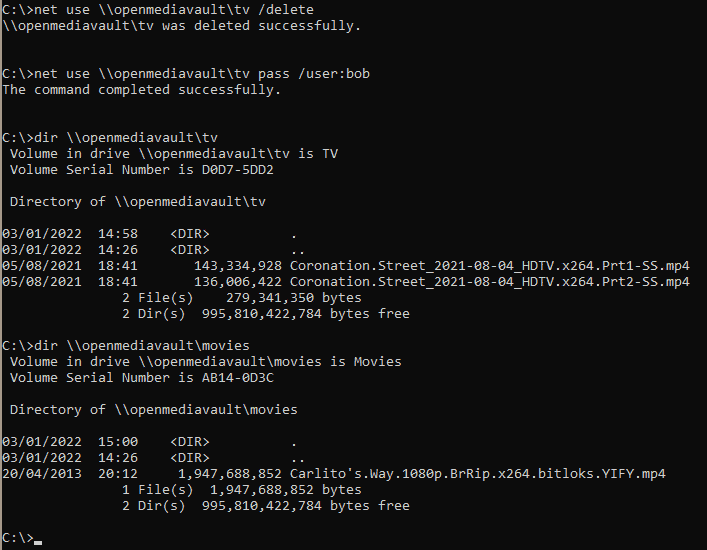
As expected, you can see that both the TV and Movies shares are accessible using the “bob” account.
Summary
I’ve installed Open Media Vault onto a fresh Proxmox virtual machine. I’ve then configured it to share two folders over SMB/CIFS to specific users/groups. The whole process was relatively intuitive.
I feel slightly uncomfortable that access permissions, once configured via OMV are then handled by just the underlying application daemon performing the sharing (Samba, ProFTP, etc). I would’ve preferred it if the underlying Linux ACLs were also restricted. From reading the OMV documentation I understand that this is possible, but not recommended in a home environment due to the complexity.
Were I to continue using OMV for sharing my media with Windows clients, I’d probably dive a little deeper into the underlying security. For me, I think I’ll continue using smbd and nfsd natively from a vanilla Debian machine, for now, manually handling permissions/ACLs.
It seems OMV is capable of a lot more than I currently need (RAID management, Certificate management, scheduled RSYNC tasks, etc). When it’s time for the next hardware refresh and I look to rebuild my environment I may well have another try of OMV as all in all it feels nicely put together.
I was stuck in the section “Installing Proxmox guest agent (Qemu-guest-agent).” I tried logging into the VM console as well as an SSH session. Then seamed to recall root cannot login into shell (am I correct?). Created a new account with admin rights and was able to logon.
Could not get the latest version of OMV to boot in Proxmox (openmediavault_6.0.24-amd64).
Switched to the older version you used in your tutorial (openmediavault_5.6.13-amd64) and it works no problem. I was then able to just run the updates and everything works.
OMV6 in Proxmox VM, working as charm with passed through HDDs.
First I used Proxmox VirtIO disks, but when u have low RAM (like me, 8GB) when uploading large files 3+GB to OMV SMB share, RAM fills up and the speed drops to few MB/s. With disks passed through to OMV i keep 112MB/s all the time. Thanks for the write-up man!!!
Your guide is excellent.
For the first time Ive not had to call on first aid – for OMV or for me!
Thank You