Contents
Introduction
Every once in a while, I’ll receive a message or comment from someone who’s accidentally stumbled upon this blog. They’re not digital hoarders, and sometimes not even technically minded. They’ve usually been searching for a solution to a technical problem they’re having and by some fluke, they’ve found my blog and decided I sound like I might be able to help.
As you’ve probably guessed, this has happened recently and hence I’m writing this post! About a fortnight ago, a very nice lady got in touch asking if I could help her to stop the hard drive in her computer from constantly running. It turns out that not only was the noise of her drive keeping her awake at night (I gather her PC was in her bedroom), but with the soaring costs of electricity, she was becoming concerned that the hard drive spinning away 24/7 was driving up her energy bills.
Being the kind soul that I am, I, of course, helped her out but then thought if people are finding their way here when searching for solutions to this problem (I’m becoming known as a hard drive aficionado it seems), I should make a dedicated post about it. With that said, if you’re here because your hard drive is constantly spinning and driving you mad, you’re in the right place, please read on! If on the other hand, you’re a regular reader and full-blown data-hoarder then feel free to ignore this post as I’m sure you’ll find it pretty useless.
Before we get started, I’m going to use the terms “hard drive”, “hard disk”, and “hard disk drive” interchangeably. You can consider them to all mean the same thing.
Why does a hard drive run constantly?
Without getting too technical, a hard drive works by having a spinning platter that holds your data and a moving arm that hovers over the platter reading or writing the data using a magnet. As you might imagine, being a mechanical device, a hard drive is quite slow (i.e. slower than purely electronic components), and using motors to spin up the platter takes a few seconds.
Because computers typically expect a hard drive to be ready to send or receive stored data at a moment’s notice, it makes sense for the hard drive to keep its platter constantly spinning. This way, if the computer suddenly requests data from the hard drive, the drive doesn’t need to engage motors, which would cause a delay. It is instead ready to go.
Hard drive power saving
In the case of a computer being actively used, the above explanation of why a drive runs constantly makes perfect sense. It needs to be running constantly so that it’s ready for action.
However, if a computer is only used infrequently, then having the hard drive running constantly is a little bit wasteful. For example, if the computer is a typical home desktop PC, you might finish playing a game, go and eat dinner, watch TV for a couple of hours, and then return to the PC to look up some flights. All that time when the PC wasn’t being actively used (whilst you were eating and then watching TV), energy was being wasted keeping the hard drive spinning. This is where power-saving features come into play.
You could tell your computer that if the hard drive hasn’t been used for a prolonged period, it can be spun down. For example, we could set the idle time to 10 minutes. In the above scenario, you would finish playing your game, and go off to have dinner. Ten minutes later, the hard drive would stop spinning and all the while you’re eating dinner and watching TV, the hard drive is idle, wasting no electricity and not making any noise. When you eventually return to your PC to book some flights, the hard drive will spin up once again. Of course, you’ll need to wait a few seconds for the spin-up to occur but it’s a small price to pay.
Enabling hard drive power saving on Windows
If you want your hard drive to stop spinning when it’s not being used, then you’ll need to enable power saving. If like the majority of people you’re using Microsoft Windows as your operating system, you’ll just need to follow these instructions. These instructions are based on Windows 10 but the process is very similar with other versions.
Step 1
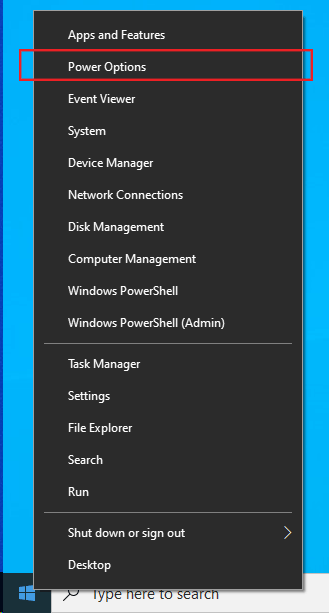
Right-click on the Windows start menu icon, then click on “Power Options”.
Step 2
Once the Power and Sleep settings window has opened, click on the “Additional power setting” link under the “Related Settings” heading. As you can see in the image, it’s about halfway down the window.

Step 3
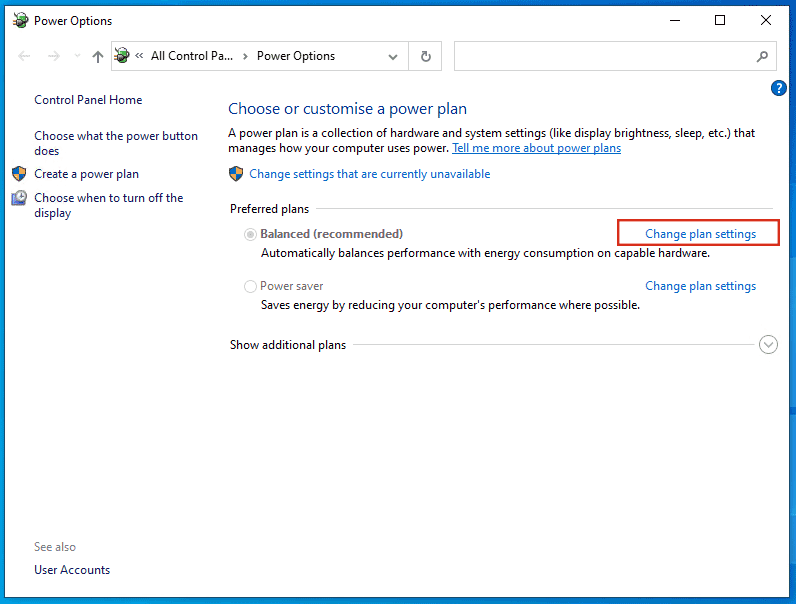
A Control Panel window should now be open, asking you to choose or customize a power plan. We’re going to leave your current power plan in place, but we’re going to customize it so that your hard disk spins down when not in use.
Click on “Change plan settings”, next to the selected power plan. In my case, the “Balanced” power plan is in use, but on your computer, this might vary.
Step 4
The hard disk power saving settings are for some reason considered advanced, so we’ll need to click “Change advanced power settings”.
[ Wow, look at you with your “advanced” technical skills 😉 ]

Step 5
From the advanced settings, there are a couple of things to do. Firstly, if you see the text “Change settings that are currently unavailable” then you need to click on it. If you don’t see this text then don’t worry, it just means that your system security is a little different from mine. Take a look at the image below.
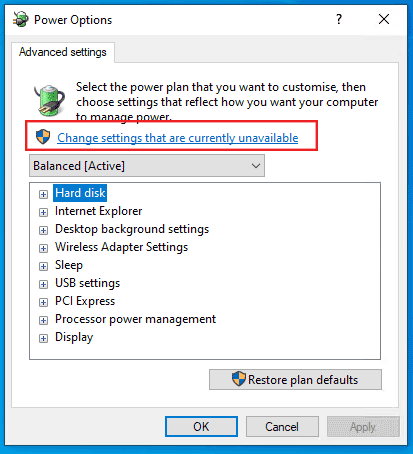
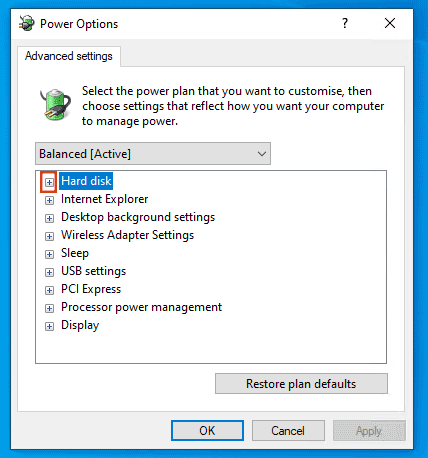
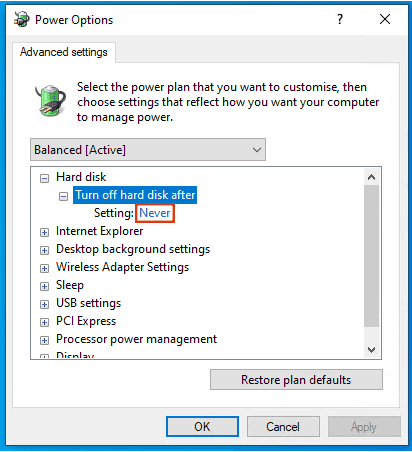
Now that the settings can be changed, you need to scroll down to the “Hard Disk” section and expand it by clicking on the little plus symbol that’s next to it.
With the hard disk section expanded, you should be able to see the current power-saving setting. In my case, the “Turn off hard disk after” value was set to “Never”. This indicates that the hard disk will never be turned off or spun down, even when the system has been idle for a long period.
It may be that your system has another value in this field. In any event, you’ll want to click on the value in order to change it.
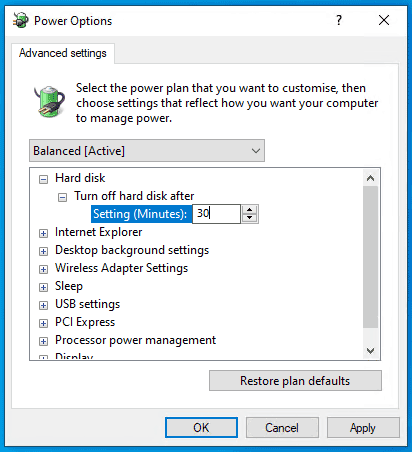
Now you’ve clicked on either the word “Never” or the old value, you’ll be able to enter a new value. The value is the number of minutes you want the computer to wait before spinning down the idle hard disk. I’m going to enter “30”. In other words, the hard disk will spin down after it hasn’t been used for half an hour.
After entering the new value, click “OK.
That’s all there is to it, simply leave your computer alone for the number of minutes you decided upon and you should find that the hard disk is automatically switched off. When you try to use the computer again, you’ll find the hard disk will spin back to life.
Hard drive not spinning down when idle?
Occasionally, you’ll run into the problem that power-saving is enabled and configured to spin down the hard drive, yet it doesn’t seem to work. You might discover that regardless of the idle time you set, the drive still runs constantly.
Usually, this problem occurs because although you may not be using the computer, there’s some background activity accessing the hard drive so technically it’s not idle.
Quite often when this problem occurs, it’s due to something like a virus scan or search indexer running silently, reading or writing data to the hard drive.
Fortunately, on modern versions of Windows, it’s actually quite simple to find out what’s accessing the hard drive, even without the need to install third-party applications. Since Windows Vista, all versions of the operating system have included a utility called “Resource Monitor”. Resource Monitor (Resmon for short) is an easy-to-use tool that lists your hard drives and shows you in real-time which programs are interacting with them.
How to check hard drive activity with Resource Monitor
Step 1
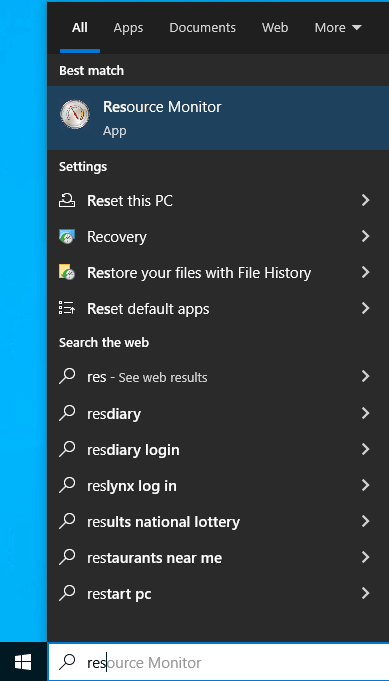
The first step is of course to launch the “Resource Monitor” utility. As mentioned earlier, it’s shipped as standard with all versions of Windows since Vista so unless your computer is practically an antique, you’re good to go.
Simply click on the Windows start button and start typing “Resource Monitor”. You should find that the Resource Monitor icon appears in the search results like in the image below. Once it does, simply click on it
Step 2
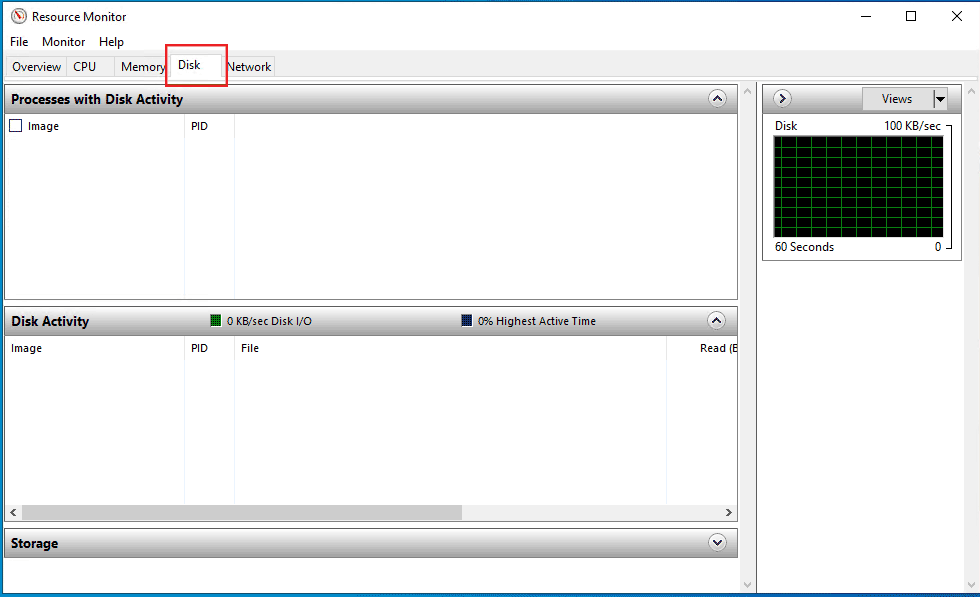
There are a number of tabs across the top of the Resource Monitor utility. You’ll need to click on the one labeled “Disk”.
Step 3
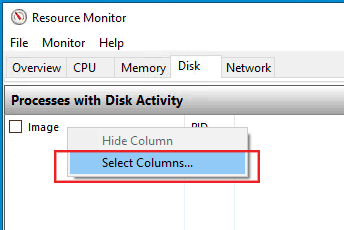
If there isn’t already a column named “Total (B/Sec)” showing, then you’ll need to add it. To do this, right-click on an existing column (such as the one named “Image”), and then click “Select Columns”.
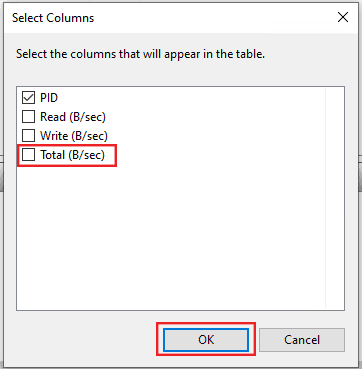
Now, make sure that “Total (B/Sec)” is ticked, and then click “OK”
Step 4
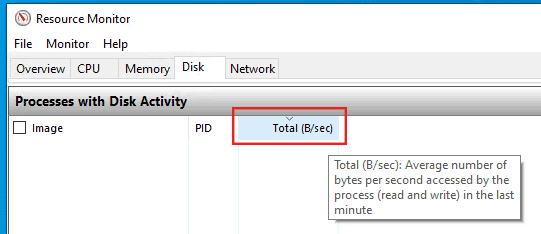
Click on the new “Total (B/Sec)” column header to make sure that the data is ordered by the values in this column. We want the highest values to be on top, so the column should have a little arrow pointing downwards to indicate this. Take a look at the image below.
Step 5
After a few moments, you’ll find that any processes accessing the hard drive will start to be listed. As we’ve ordered the data by the total, descending, the process with the most disk activity at that moment will be listed on top.
On my system, you can see in the below image that the biggest culprit is a process called “MsMpEng”. I happen to know that MsMpEng is the Microsoft Anti-malware service, forming part of Windows Defender.
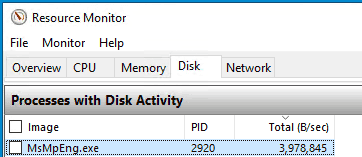
It’s accessing the disk quite heavily because there’s currently an anti-virus scan taking place so there’s no way Windows would be able to spin down my hard drive because it simply isn’t idle.
In your case, it will likely be something other than “MsMpEng” that’s accessing your hard drive. If you don’t recognize it then putting its name into Google is a good starting point. It could be any number of things (an Anti-Virus scan, an automatic software update, etc) so you’ll need to do some further research.
Summary
Hard drives need to be spinning in order for you to be able to read data from them or write data to them. To save energy and reduce noise, however, it’s possible for the operating system to detect when a hard drive hasn’t been accessed for a number of minutes and spin down or power off the idle hard drive. This is known as power-saving and within Windows, it can be fine-tuned by making use of what Microsoft refer to as a “Power Plan”
Usually, specifying the disk’s idle time within your active power plan is sufficient, and you’ll find that the hard drive will automatically power down after this number of minutes has elapsed.
Occasionally, even though there’s an active power plan in place and enabled, you may find that your hard drive still runs constantly and doesn’t spin down after the system has been idle for the amount of time you chose.
The cause of this is usually that the disk isn’t truly idle, because there’s a background process running and accessing the hard drive. This background process could be any number of things, so we’ve covered using a built-in Windows tool called “Resouce Monitor” to find out what this rogue process is.
The information shared is extremely helpful! Thank you for sharing!
What if your computer runs the hard drive but refuses to start up so you cannot access anything?
thank you
A quick thanks for helping me identify what was mad-spinning my HD ( Chrome )!