Introduction
A few months ago, I was reading an article that mentioned Oracle were offering some of their Oracle Cloud Infrastructure (OCI) services for free. The so-called “Free Tier” provides enough resources to be able to run 2 AMD virtual machines (VMs) 24/7, and includes 200GB of free cloud storage too.
Update: Oracle have recently expanded their free tier to allow you to also create ARM-based VMs with a combined total of 4 CPU units and 24GB RAM. This is in addition to the two standard AMD VMs that I’m writing about in this post.
Update: October 2022.
A number of readers have recently been in touch to advise me that sadly, Oracle no longer allow us to upload custom Linux images on their free-tier. They appear to have made this change around a month after this post was first published.
The custom Debian images that I previously uploaded are still present on my free-tier account, and I am still able to deploy new cloud VMs using them. This would suggest that you may be able to subscribe to a paid plan for a limited time, to allow you to upload your Debian images, and to then revert back to the free-tier.
A few people in the “home lab” community are using their free VMs to learn and experiment with and most have reported no issues. I know that Oracle (the corporation) have a bit of a bad name in the open-source community but I personally have never had a problem with either them as a company or the services they provide.
I decided I should signup for the free tier and give it a spin. I don’t honestly expect to use it for too much but if nothing else, the free 200GB storage might come in handy for scratch space or to hold backups of backups.
Debian
As my regular readers will probably know, when it comes to Linux, I’m a fan of the Debian distribution. To be clear, I have nothing against Debian derivatives like Ubuntu and Mint, I actually think they serve a real purpose. For me, however, I like a vanilla Debian installation, particularly on servers. I prefer a stable release channel and a tiny initial installation so that I can choose which packages I want from the ground up. I also believe that starting with a minimal Debian installation is conducive to good security as it’s easier to keep track of which packages are installed, which services are running, and which ports are open.
Installing Debian on a new Oracle Cloud VM
Unfortunately, it seems that Oracle don’t offer a vanilla Debian image as standard. Apparently one used to exist but for whatever reason, it is no more! The closest thing available is Ubuntu LTS and whilst this would be fine for my use cases, I decided to do a little testing to see if I could get true Debian running. As it turns out, getting Debian installed was actually fairly straightforward but I thought I would make this post both for my own benefit, should I ever need to repeat this in the future, and also in case it helps someone else out.
Download Debian “Generic cloud” image
Luckily for us, some nice people on the Debian team have created a “generic cloud” version of the Debian image, and it works perfectly with Oracle Cloud/OCI AMD-based “shapes”.
Head over to https://cloud.debian.org/images/cloud/ and browse the folder belonging to the Debian release that you’d like your VM to run. I wanted the latest release, which at the time of writing is Debian Bullseye (11).
The image you need is the one containing the term “genericcloud”, “amd64”, and with a file-extension of “.qcow2”. In my case, the complete filename was “debian-11-genericcloud-amd64-20220503-998.qcow2”.
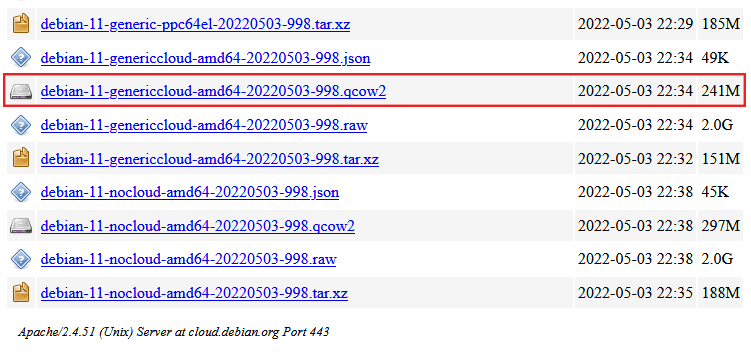
Once you’ve found the appropriate image, download it to your computer. The image I chose was just over 240MB so if you’ve got a half-decent Internet connection, the download should only take a few moments to complete.
Off-Topic: I’ve just recalled a distant memory of downloading a Windows XP preview ISO over IRC DCC back in the day. It came down at 5KB/s and took days to complete. The thought of a 240MB download taking “a few moments” on my home Internet connection would have been crazy in those days. We really are living in the future kids!
Upload the Debian image to Oracle Cloud
Now that you have the Debian installation image (in the “QCOW2” format) on your computer, you need to upload it to OCI so that it can be used to build a new VM.
Like many cloud providers, Oracle use the concept of a “Storage Bucket” when referring to storage locations on their platform. Assuming this is your first time using OCI, you’re going to need to create a new storage bucket into which we’ll then upload the Debian Image.
Create a new storage bucket
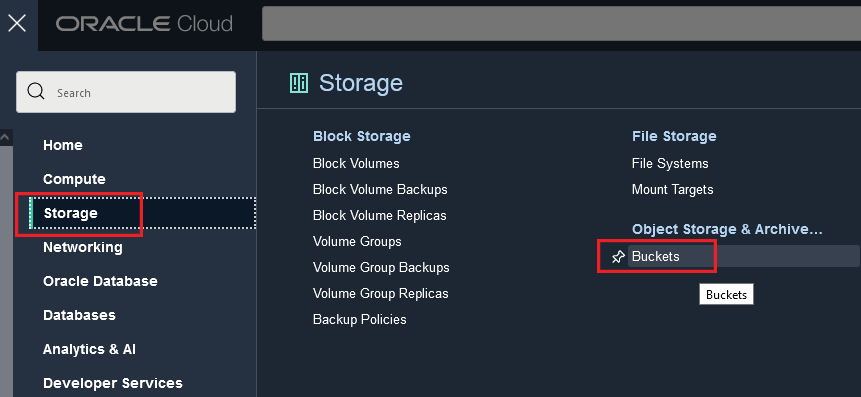
Click on the website menu and browse to “Storage”, and then “Buckets”
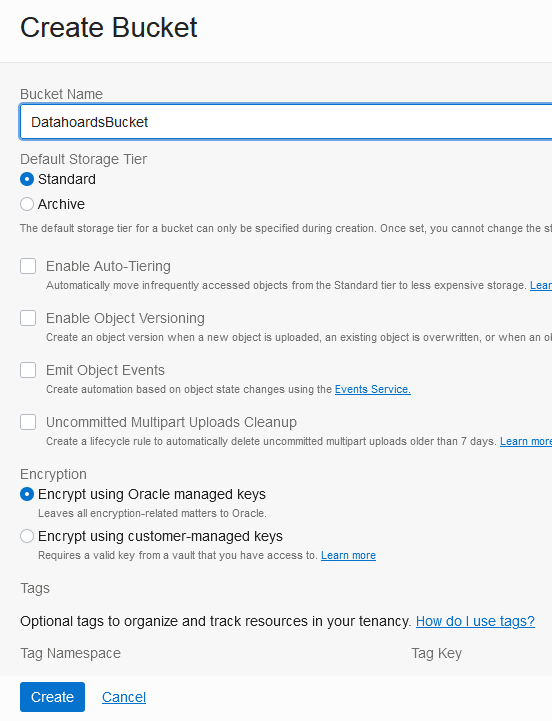
Now, give your new storage bucket a name, you’ll see in the image below that I named mine “DatahoardsBucket”. Make sure the storage tier option is set to “Standard”. For the purposes of this demonstration, I left the encryption set to “Encrypt using Oracle managed keys” but feel free to experiment by yourself.
Import Debian as a custom image
At this point, you should have a new storage bucket created, and within it should be the Debian installation image that you downloaded in the QCOW2 format.
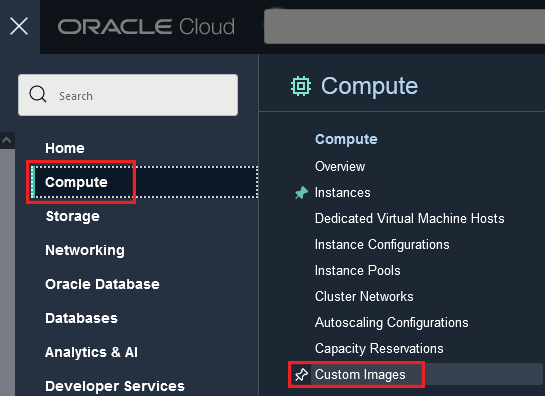
Before we can build a new VM, we need to perform an import so that Oracle can tweak the image to work on their cloud platform. To do this, click on the main website menu, go to “Compute”, and then “Custom Images”.
You should find that no images currently exist, so your only option is to click “Import Image”.
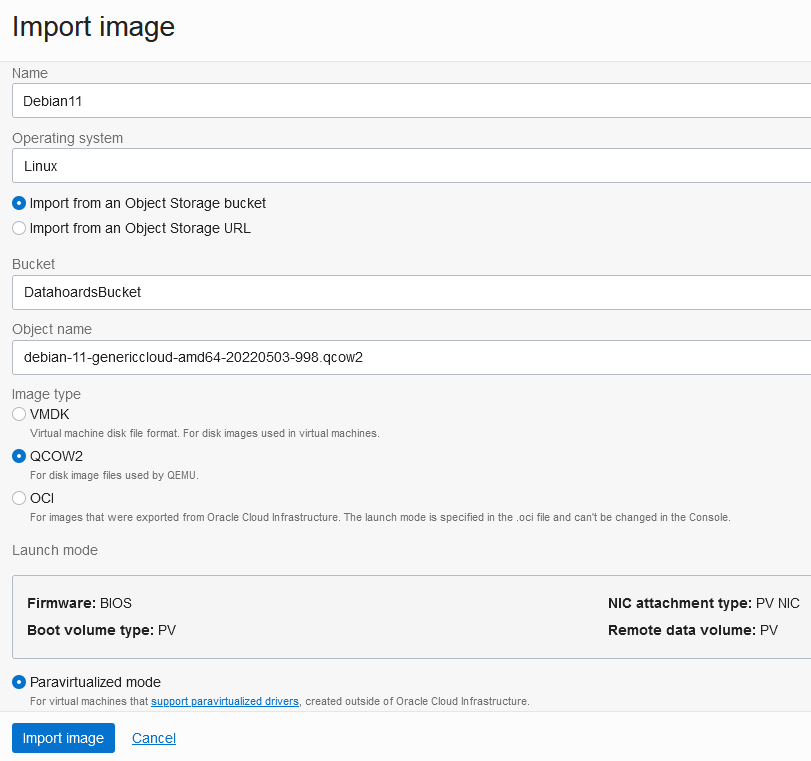
Give your new image a descriptive name, mine’s simply called “Debian11”. Make sure that “Operating System” is set to “Linux” and that you’ve selected “Import from an object storage bucket”.
Select the storage bucket that you uploaded the image to, and the Debian QCOW2 image itself.
Check that the image type is correctly set to “QCOW2” and that under “Launch Mode”, “Paravirtualised Mode” has been chosen.
Finally, click on “Import Image”.
This step sounds a little complicated but it isn’t really. A picture paints a thousand words, so have a look at the image below for guidance.
Wait for the image creation to complete
After executing the image import, Oracle will need to convert the Debian image from the QCOW2 storage format to allow it to be used for VM creation. This isn’t instantaneous, so you’ll notice that a new “Work Request” has been created at the bottom of the screen:
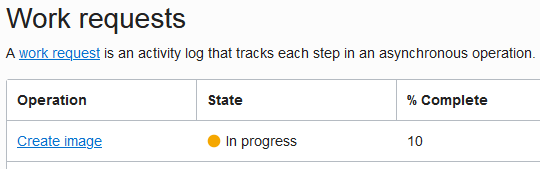
For me, the “Create Image” operation seemed to get stuck at 10% for a few minutes, and then it quickly completed. The whole process only took 11 minutes to complete. If you’ve been waiting for more than ten or twenty minutes and aren’t seeing much progress, I would recommend refreshing the page just to be sure there isn’t a UI glitch.
Create a new VM instance on OCI
Oracle call their virtual machines “Instances”, so now it’s time to create a new instance to get you up and running.
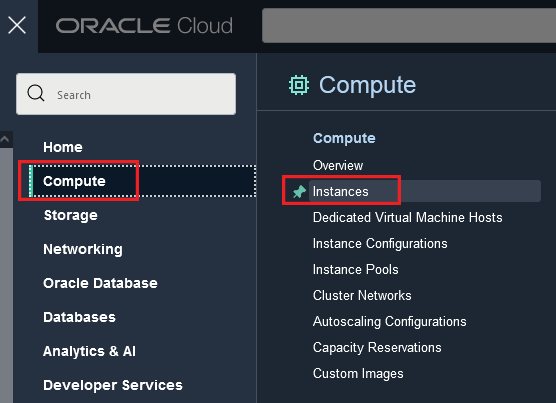
From the main dashboard menu, navigate to “Compute”, and then “Instances”.
At this point, you get to decide what you’d like your new VM (i.e. Instance) to look like. You can allocate resources (by selecting or customizing a “shape”), and select the operating system image to use. I selected the “VM.Standard.E2.1.Micro” as the hardware “shape”, it’s powered by an AMD virtual CPU and comes with 1GB of RAM, which is fine for testing.
Of course, I’m going to select my new Debian 11 image for the operating system. This is done by clicking “Change Image”.
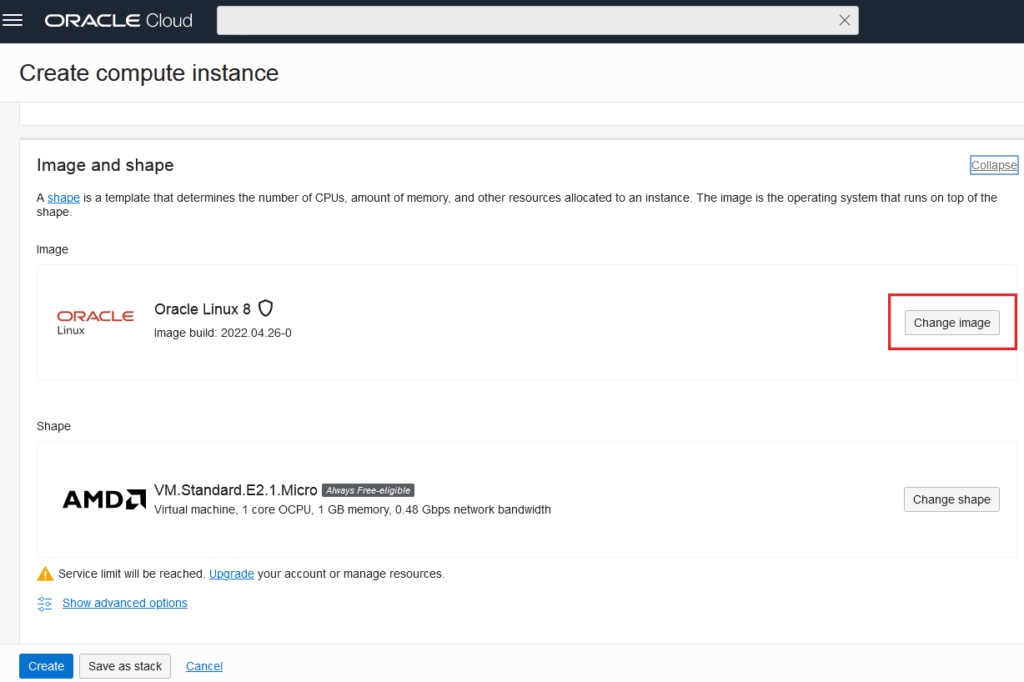
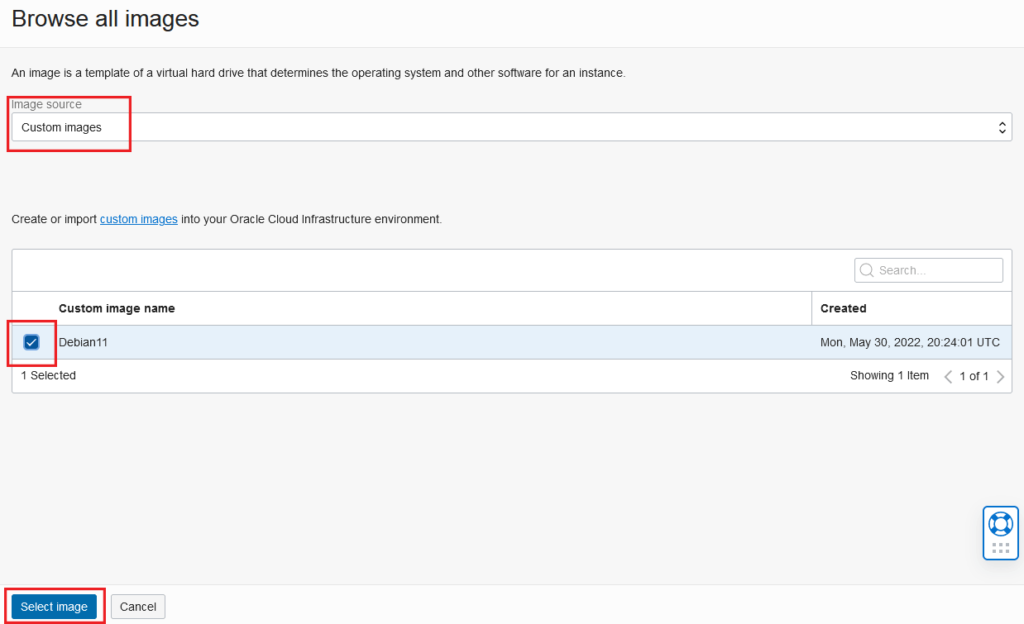
Change the image source to “Custom Images”, then click the tick box next to the Debian image, and finally click “Select Image”.
The next steps are to configure the networking for your new VM instance and to either generate or provide SSH keys to allow you to connect to it later. I won’t cover these steps as they’re fairly straightforward and aren’t unique to Debian.
Finally, you’ll want to click “Create” and wait patiently for your new VM to be created. Don’t worry, it doesn’t take long, mine was ready in about 30 seconds.
Connect to your new Debian OCI VM instance over SSH
Once your new Debian VM is up and running, you’ll need to connect to it over SSH to access it. This is done in the same way that you would connect to any other standard Oracle VM instance, with the exception that the username used to connect is different. In our case, the username will be “debian” (rather than, for example, “ubuntu”).
If you use PuTTY, it’ll look something like this:
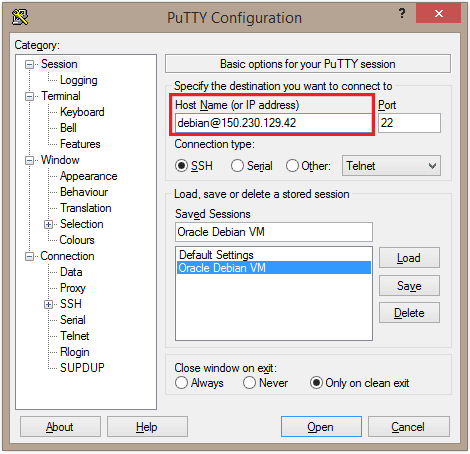
Of course, you’ll still need to select your private key (from under “Connection”, “SSH”, “Auth”), as usual.
Update your Debian OCI VM instance
Once you’ve connected to your new VM over SSH, it’s good practice to check that the system and all its packages are up to date. There’s nothing special about this, but I’ll include it here just as a reminder.
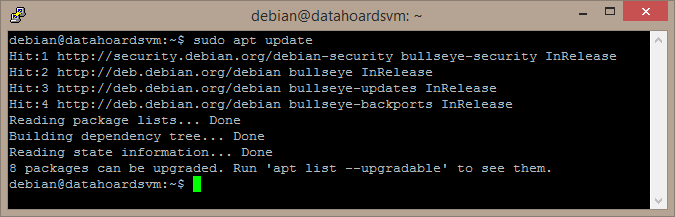
Firstly issue a “sudo apt update” command and see if it reports that there are any packages with an update available.
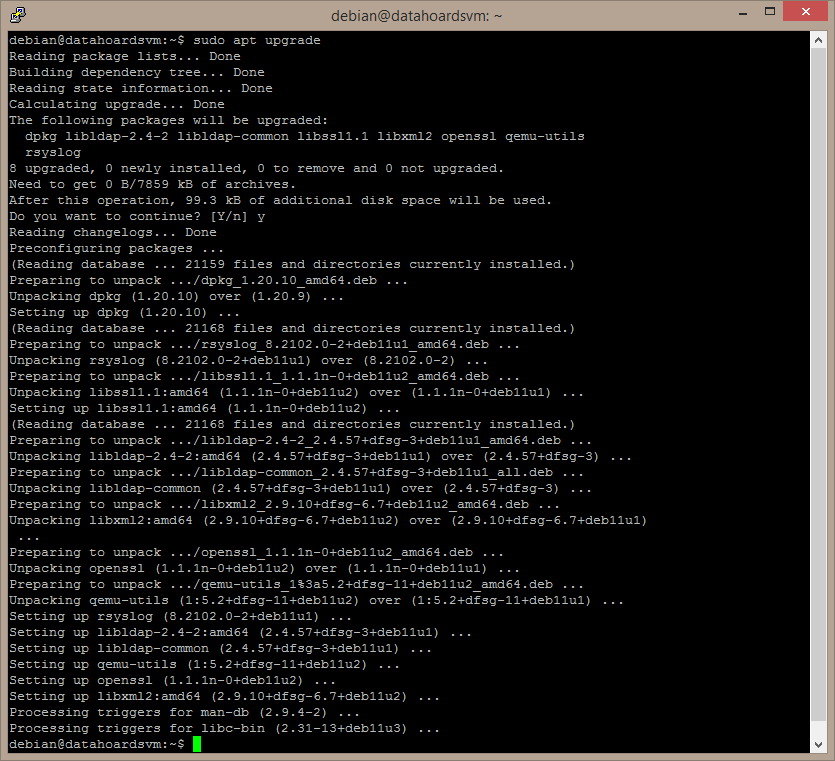
Assuming it does, then issue a “sudo apt upgrade” command and wait for updates to finish installing. There shouldn’t be many as we’ve built the VM using a recent Debian image.
Summary
Oracle are seemingly feeling generous, and have provided us with a “Free Tier” on their cloud computing platform with enough resources to run a couple of VMs 24/7.
It seems Oracle are trying to push us to use Oracle Linux (which is understandable) or Ubuntu on our newly created VM instances. Luckily for Debian fans though, it’s easy to manually import a current Debian image into the Oracle platform and have our VMs run this instead.
I hope you have fun with your new VMs but keep in mind that anything “free” is prone to sudden disappearance so make sure you keep backups of anything important.
Thanks so much for this! One comment: after creating the bucket, you don’t actually say how to upload the debian*.qcow2 file prior to the step of Importing the image. But other than that, great info!
P.S. I tried to get an ARM version to work using your method & the appropriate qcow2 file, but Oracle’s cloud rejected it. 🙁
You can use ARM64, but you need to go to ‘Edit details’ of the image and enable it for the shape VM.Standard.A1.Flex.
How I can edit the debian image and enable this option?
Thank you – very useful!
Now it’s not posible to upload the image, if you don’t upgrade to paid account.
“To use this service or resource, you must upgrade to a paid account.”
This doesn’t work anymore as of 10/06/22. Custom images are no longer part of the free tier and the account needs to be upgraded
When was a few months ago ? We are oct 13th 2022 and it seem that custom images is no longer part of the free tier
Thank you very much. It is very useful.
Hi. thanks for this write-up.
I would add that they don’t allow you to use custom images in the free tier which is a bummer, but oh well 😉
Oi, mesmo se vc fizer o upgrade e usar ela ? depois se voltar para o nivel gratuito para de pegar?
Hi Thiago,
No, it appears that custom images uploaded whilst on a paid tier remain available for deployment, even after downgrading back to the free tier.
It says: Service limit will be reached. Upgrade your account or manage resources.
What is that mean?
I have just setup debian custom image in free tier using Frankfurt region.
Is it region based that you could use custom image or not?
https://ss.codeone.pl/ss-2023-07-21-23-11-49-1689973909-cp6wBZK1.png
How did you do it? I have Frankfurt region, I could only download the image but I can’t import it, I get a message that I have reached the limit.