The increasing popularity of the VLive video streaming website has led to a number of users searching for ways to download videos from it. Perhaps you’ve found a channel that you love and you want to archive its contents just in case, for some reason, it disappears? While there are a number of websites offering a VLive download service online, today I’ll show you the method I use to download videos directly to my computer.
The best way to download VLive videos is to use youtube-dl. It’s a free piece of software which as its name suggests, was originally developed to download from YouTube. Fortunately for us, the software has been improved over the years and it now supports VLive too. Using youtube-dl instead of a dodgy website guarantees you’ll be getting the best quality video possible.
Step 1 – Download the software
I’m going to assume you’re running Windows for the purpose of this article. The software also works with Linux and Mac OS and the process is broadly similar. If you’re not running Windows then I’m sure you’re smart enough to get things up and running without my help.
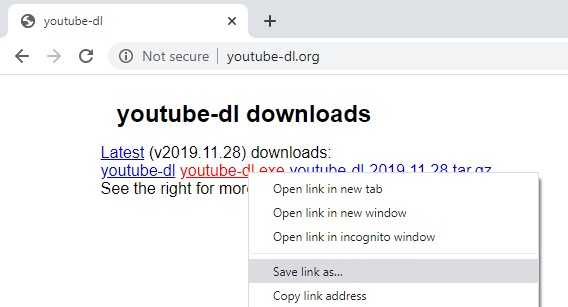
- Head over to https://youtube-dl.org/
- Right-click the link titled youtube-dl.exe and select “Save link as…”
In this case, I’m going to save the program to my desktop. There’s no installation wizard so you’ll need to run the program from wherever you choose to save it.
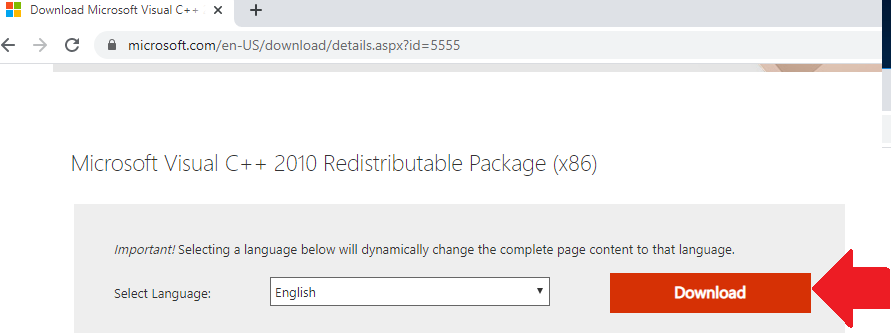
To run properly youtube-dl requires some additional from software from Microsoft (Visual C++ 2010 Redistributable). Download it from here and then install it.
Step 2 – Running youtube-dl
The software is run from that command line (meaning there’s no GUI or fancy graphical window) but don’t be daunted, I’ll walk you through it.
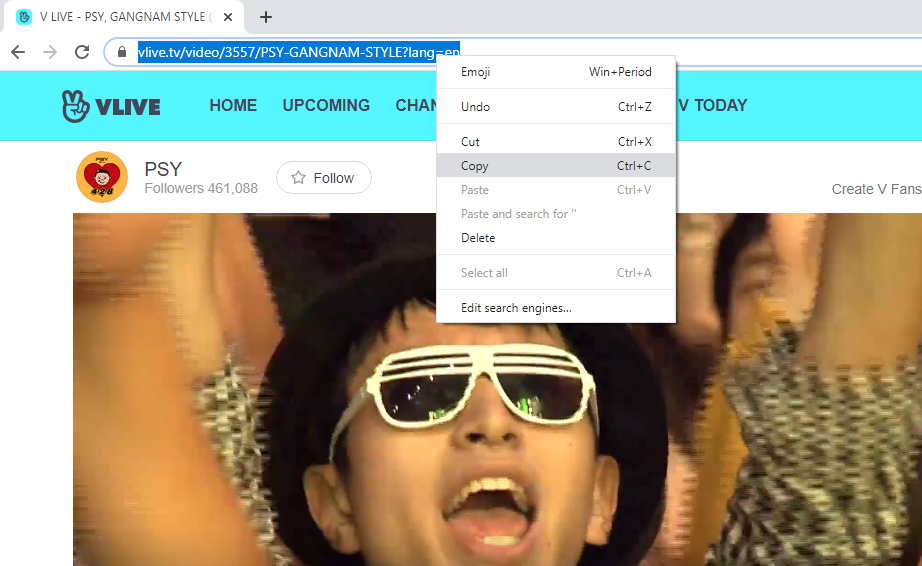
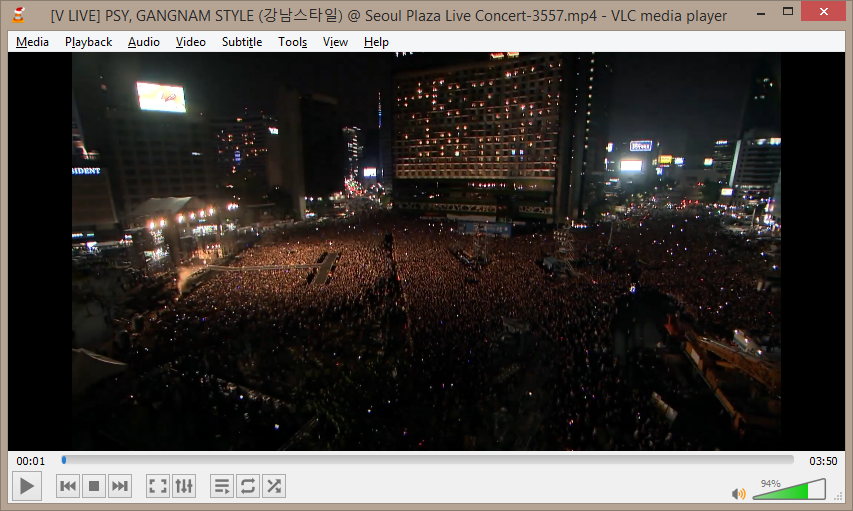
Firstly go and copy the URL of the VLive video you want to your clipboard. The URL is sometimes referred to as the Web Address and it found in the address bar of your browser. For example, here I’m heading over to VLive and grabbing the URL of a Gangnam Style video that I’m loving.
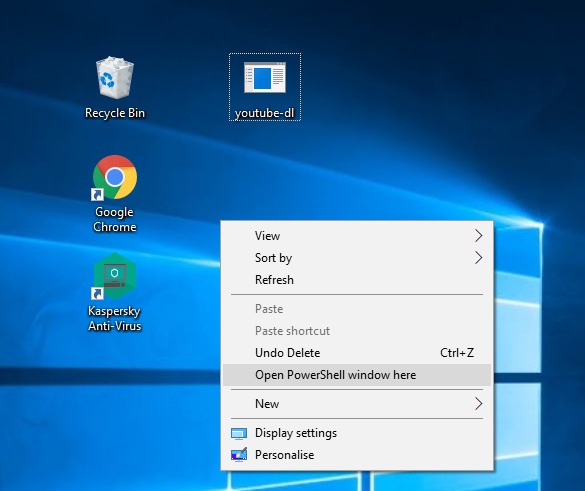
Browse to wherever you chose to save the program. I chose my desktop so that’s where I’ll go to. Hold down the Shift key and Right-click the folder (or desktop in my case) and select either “Open command window here” or “Open PowerShell window here”
If all went to plan, you’re at a PowerShell or Command window and now moments away from having your favourite VLive videos downloaded to your computer. Now just type .\youtube-dl followed by the URL of the VLive video you want and hit Enter. Hint: You can paste the URL from your clipboard by right-clicking.
The software will connect to vlive.tv and begin downloading the video to your hard drive. The videos can be quite large so depending on your Internet connection speed this process could take some time. Youtube-dl will report its progress so that you know it’s working, I have a 100Mbps Internet connection and you can see that the Gangnam Style video took a little over a minute to complete.

The video should now be saved as an mp4 file on your desktop (or wherever you ran youtube-dl from). Assuming you have suitable video playback software (e.g. VLC) installed, double-clicking the file should make it start playing.
Downloading Subtitles from VLive
Most datahoarders of VLive k-pop videos like to save subtitles along with the actual video. If the videos aren’t in English (most are not), having English subtitles is a real benefit. Fortunately, we can use youtube-dl to download the subtitles to a separate file by using a few additional parameters.
Before I show you the process of downloading subtitles, let me explain a little about them in the context of VLive. If you’re familiar with YouTube you’ll know that the majority of videos have subtitles (or closed captions as they’re sometimes called), either aut0-generated or manually curated. You can switch the subtitles on and off easily as they aren’t embedded into the actual video recording. The situation is much the same on VLive except there are no automatically generated subtitles so it’s up to the creator of the video or viewers to add them. You’ll find that most VLive videos do not therefor have subtitles available and those that do, don’t have English subtitles. To make the matter worse, for some reason I find that most videos that do have subtitles have them embedded into the video, meaning you can’t disable them or change their language. Why this is the case I don’t know for sure but I suspect the ability to have true subtitles has only recently been introduced. If video creators have got into the habit of overlaying subs before uploading the video perhaps they’re reluctant to change to the “proper” method.
Step 1 – Checking the video has true subtitles
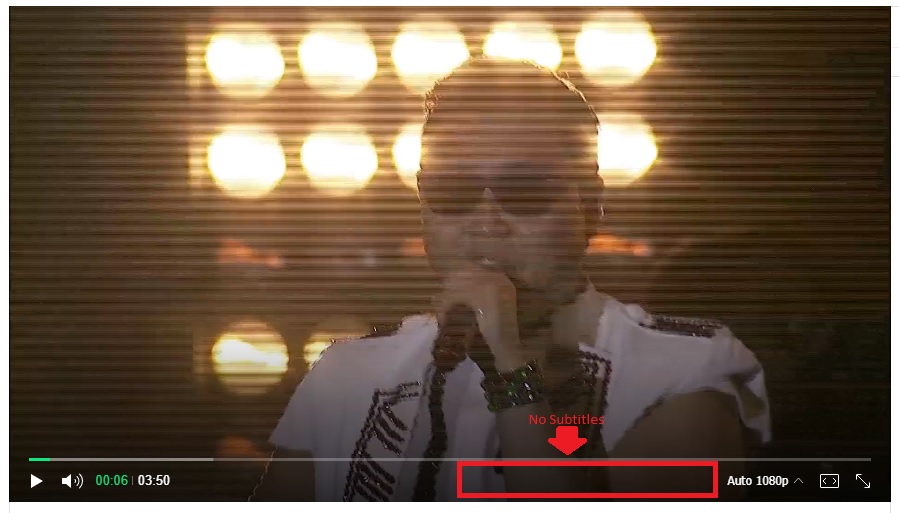
As mentioned, not many videos on VLive have true subtitles so the first step is to check that the video you’re downloading does have them, The easiest way to do this is to start playing the video and checking if there’s a “subtitle” menu at the bottom of the video, to the left of the “quality” menu. Going back to our old favourite, the Gangnam Style video as an example, you’ll notice this doesn’t have subs.
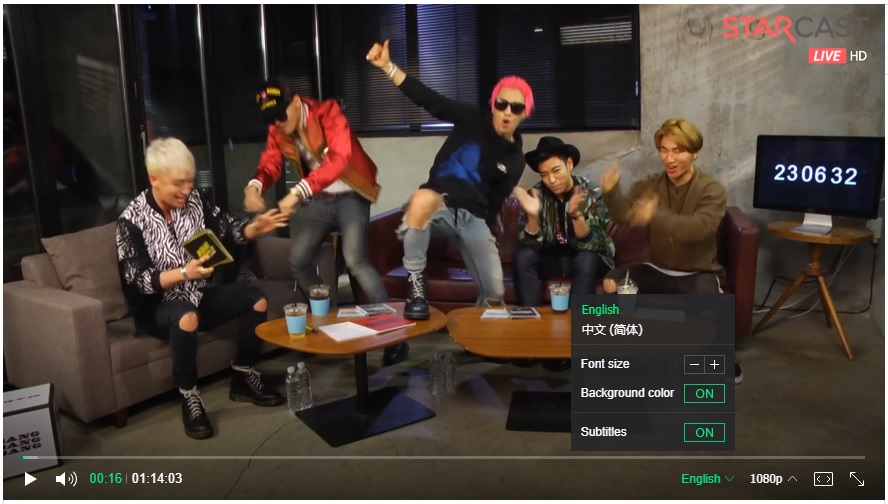
If you do see the subtitle menu then you’re in luck. Hopefully, when you click it you’ll discover it has English subs available too. Once you’ve enabled them you’ll see they’re overlayed at the bottom of the video, in a similar fashion to YouTube’s closed captions. Because they’re true subtitles and not embedded in the video you’ll notice you can change the font size, colour, etc. In the example below, you can see that this video does have subtitles due to the presence of the menu.
If you’ve been lucky and your desired video does have subtitles then you can move onto the next step. If not, perhaps you can ask a friend who speaks the language to translate and then you can make your own subtitle file.
Step 2 – Listing the available subtitles to download
The youtube-dl parameter to list available subtitles is –list-subs. We’ll run youtube-dl with this parameter to see which languages we have available. For the purposes of this example we’ll use the same video of the Korean mad-lads as we already know it has English subs available.

You can see that to list the subtitles for this video we ran .\youtube-dl.exe –list-subs https://www.vlive.tv/video/721
The output of this command shows us that there are two different languages available. en_US refers to the English subtitles and zh_CN refers to the Chinese ones. Don’t worry about the “formats” column, it’s just telling us that these subs are in the WebVTT format (.vtt file extension). You can read about it here if you really want to but it’s enough for you to know that it’s a popular format and well supported, including by VLC media player.
Step 3 – Downloading the video and saving the subtitles to file
The youtube-dl parameters we need to specify to download the subtitles are –write-sub and –sub-lang.
We’ll continue the example by downloading the VLive video of the Korean mad-lads and specifying we want English subs. The complete command we’ll therefor use is .\youtube-dl.exe –write-sub –sub-lang en_US -f 144P https://www.vlive.tv/video/721. In case you’re wondering what the -f 144P means, it’s just telling youtube-dl to download the low-resolution (144p) version of the video. You usually wouldn’t want to specify this parameter but I’m doing it to save time. If I didn’t specify the -f parameter youtube-dl would default to downloading the 1080p version of the video which in this case is a few gigabytes.

Once completed, you’ll find you now have two files saved to your desktop. You have the video file (in this case .mp4) and the subtitle file in .vtt format.
To play the file you just need to open it with VLC. If VLC is your default video player then it’s just a case of double-clicking on the video. By default, VLC will look for any compatible subtitle file in the same folder as the video. If there are multiple subtitle files in that folder (say we’d downloaded both the English and Chinese subs, for example) then you can change which one is shown using the “Sub Track” option found under the “Subtitle” menu.

Conclusion
In this post we’ve discussed why you may want to download and save videos from VLive as part of your datahoarding hobby. We’ve covered the best way to do this without sacrificing quality. We’ve also gone over how to download the video’s corresponding subtitle file and why you might want to do that. We’ve used a couple of examples, downloading a Gangnam Style concert without subs and then downloading a video of some mad k-pop stars with subtitles. You should now be confident with the whole process but if you need some help just leave us a comment!
I got this returned as a Google result for a search of “jdownloader vlive” since I had come across jdownloader when skirting out to see if any free GUI options were worth my time over a CLI tool as a slightly nervy command line idiot, and fully assumed it was going to be a marketing blog post for a different GUI option – imagine my delight at an actual blog post written by a human!
Like I said, nervy command line idiot, so I was feeling like I really had to Steel Myself Up to figure out for e.g batch dl’s with subtitles, all at once before making an attempt, but this post laying it out more plainly let me take baby steps with it, which I’m really grateful for 🙏
I don’t know if you would have caught wind of this, but the Vlive platform is actually shutting down at the end of the month – some artists are moving to the app of the company who brought is, but that app 1) requires login on desktop, which Vlive didn’t, and has a bad reputation among fans who 2) have experienced terrible physical product fulfillment from the company or 3) have experienced the homophobia enabled by the moderation team in some pockets of the app, so there ate definitely less fans moving over – so I wanted to add to this comment for any other last minute scrambling Vlive channel archivists who may also come across this article before the deadline with extra pointers:
– if you don’t want to look and pick and choose subtitles and just want to download all of them, you can use –all-subs, and yt-dl will compile and download individual .vtt files of all the subtitles, so you would type this: .\youtube-dl –all-subs https://www.vlive.tv/video/721
– if you have a list of URLs you want to download in a batch, the easiest method I’ve seen is to make a .txt file that lists those URLs and use –batch-file, so if you had a .txt file names vlives.txt, you would type this: .\youtube-dl –batch-file ./vlives.txt
– if you wanted to batch download WITH all their subtitle files (not that they don’t all need to have subtitles!), you would type this: .\youtube-dl –all-subs –batch-file ./vlives.txt
(I don’t know if the .txt file has to be in the output location – I think if it isn’t, there are extra steps, but I just put mine in the output location for ease)
– if you navigate to an individual channel’s star board (so Wanna One’s channel URL that includes fan comments etc is https://m.vlive.tv/channel/DCD44B whereas their star board URL, which is just the content streams, is https://m.vlive.tv/channel/DCD44B/board/4544), you should be able to copy that URL and download all the videos from the channel; if you’re just wanting videos, the thing to type should be this: .\youtube-dl https://m.vlive.tv/channel/DCD44B/board/4544
and for them all to have all subtitles, it should be this; .\youtube-dl –all-subs https://m.vlive.tv/channel/DCD44B/board/4544
(“Should”s are because this one didn’t work for me – the error returned most likely indicates network issues my end, which does not seem unlikely, and that seems to be the only reason this didn’t work)
Places that I pulled this all from: https://www.reddit.com/r/youtubedl/comments/ja1ypn/error_batch_file_youtubedlchannelstxt_could_not/
https://m.youtube.com/watch?v=ApcGBwPAy1I
https://superuser.com/questions/927523/how-to-download-only-subtitles-of-videos-using-youtube-dl
(I promise that my aim to be more useful to future visitors is genuine that that I am not an extremely incompetent contracted back link agent 🤖)
Thanks again for the post! Now this 4TB drive is in my arms I can get down to business of stepping into my data hoarding journey